This is the third and last introductory chapter in the How to build a custom keyboard series before turning on the soldering iron and actually build some stuff. You’ll learn how each component is constructed and the constrains we are going to face in making a keyboard. By the end of this post you should be able to pick the right keycaps, enclosure, materials and controller.
Keycaps
Keycaps can be the most critical aspect in keyboard building both from a cost and feasibility standpoint. No matter how brilliant your new custom layout is, if you can’t find the right keycaps it will be only source of frustration.
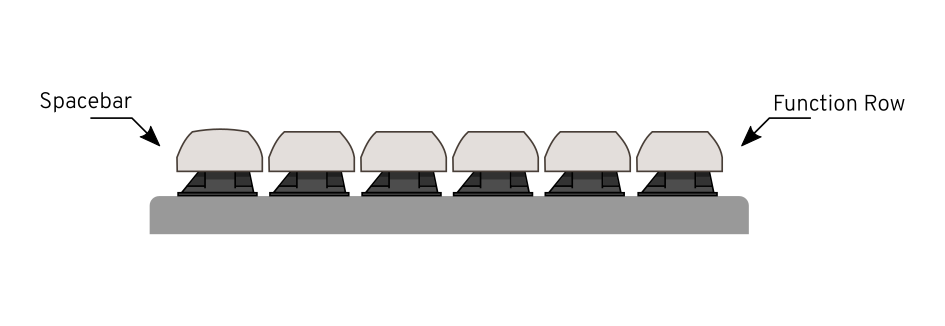
The first thing to understand is that you can’t always place the keycaps in any position you want. If you look at a keyboard from a side you’ll see that each row has its own profile and keys are sculpted with different angles.
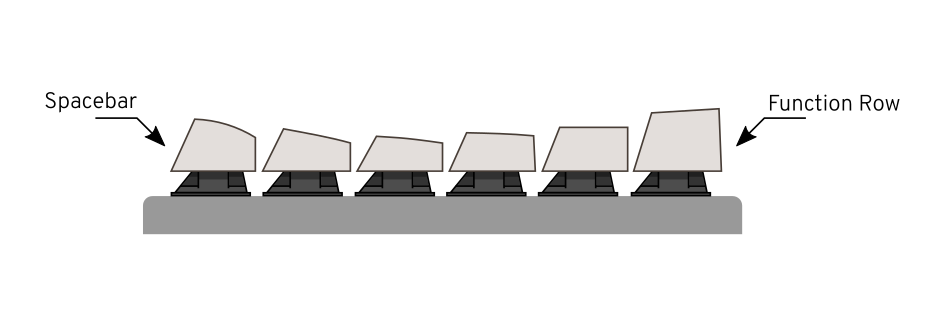
That means that you can’t put a key originally meant for the top row on the bottom, at least not without messing the keyboard profile. That is true unless of course you use a “flat” keycap set.
Flat not-angled caps like Signature Plastics DSA family are a god-sent for custom keyboard builders as keys don’t have a predetermined row and you can move them around in any location. That is especially useful if you plan on changing the default letters staggering (in a Dvorak layout for example) or if you are designing a split or ergonomic keyboard.
Another aspect to consider is the keycap size. Normally the smallest keys are the alpha-numeric (A-Z, 0-9), they are square(-ish) and their size is referenced as 1 unit or simply 1u. Every keycap on a keyboard is built around the base size of a 1u.
The default area within a keycap is contained is 19.05×19.05mm. That includes the keycap size (that will be approximately 18mm wide) and the small gap between keycaps.
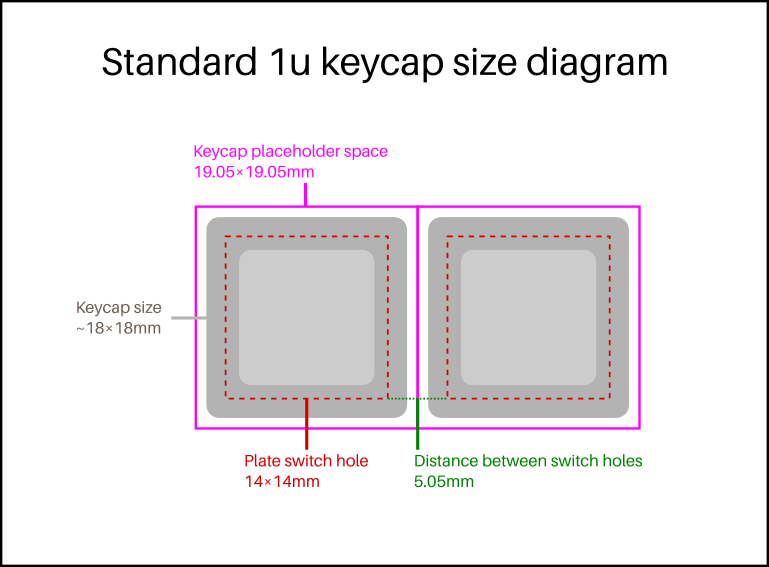
Modifiers (`ctrl`, `alt`, …) are usually 1.25 units (or 1.25u); if the unit is 19.05mm wide, modifiers are 23.8125mm (19.05×1.25); `tab` is 1.5u or 28.575mm (19.05×1.5); `backspace` is 2u or 38.1mm and so on and so forth. This is very convenient when designing a keyboard or a keycap set.
You shouldn’t have much troubles finding the alphas in both flat and sculpted family, but it can be problematic to source symbols, modifiers, spacebar, `enter`, `tab`, … in a size that is not the standard one. This is true for Cherry MX that is the most common switch, let alone for more extravagant ALPS or vintage switches.
The community has been very active these last few years, first of all check if in the past it has been organized a group buy that includes the keys you need. DSA Retro, Granite and Round 5 & 6 are all known to feature the weirdest key sizes.
Another option is to have a set printed at WASD Keyboards; they offer an interesting customization tool that lets you design the legends in any way you want.
If you need even more unique keys the next step would probably be to 3D print or custom build them, but that is a bit outside the scope of this introductory chapter.
The moral of the story is: before going crazy with super complicated layouts, check if you can find all the keycaps you need!
The Case and Layout
The layout is going to influence size and shape of your keyboard. You can go pretty crazy with it but more keys means higher cost and will likely end up being more complicated to design and build.
Small keyboards are easier and cheaper, you can possibly reuse an existing case (aftermarket Poker cases are easy to come by) and laser cutting would be relatively inexpensive. Also consumer 3D printers have a build area of about 20×20cm so anything below that size would be easy to 3D print at home in one shot.
Another option is to re-use an existing case. For example the Apple M0110 is a pretty versatile case; big enough to host any controller or even a battery if you want to go wireless. The problem is that you have to tweak the case in some way. You’d probably need to custom build a plate and sometimes it’s just more practical to simply go with a completely new case.
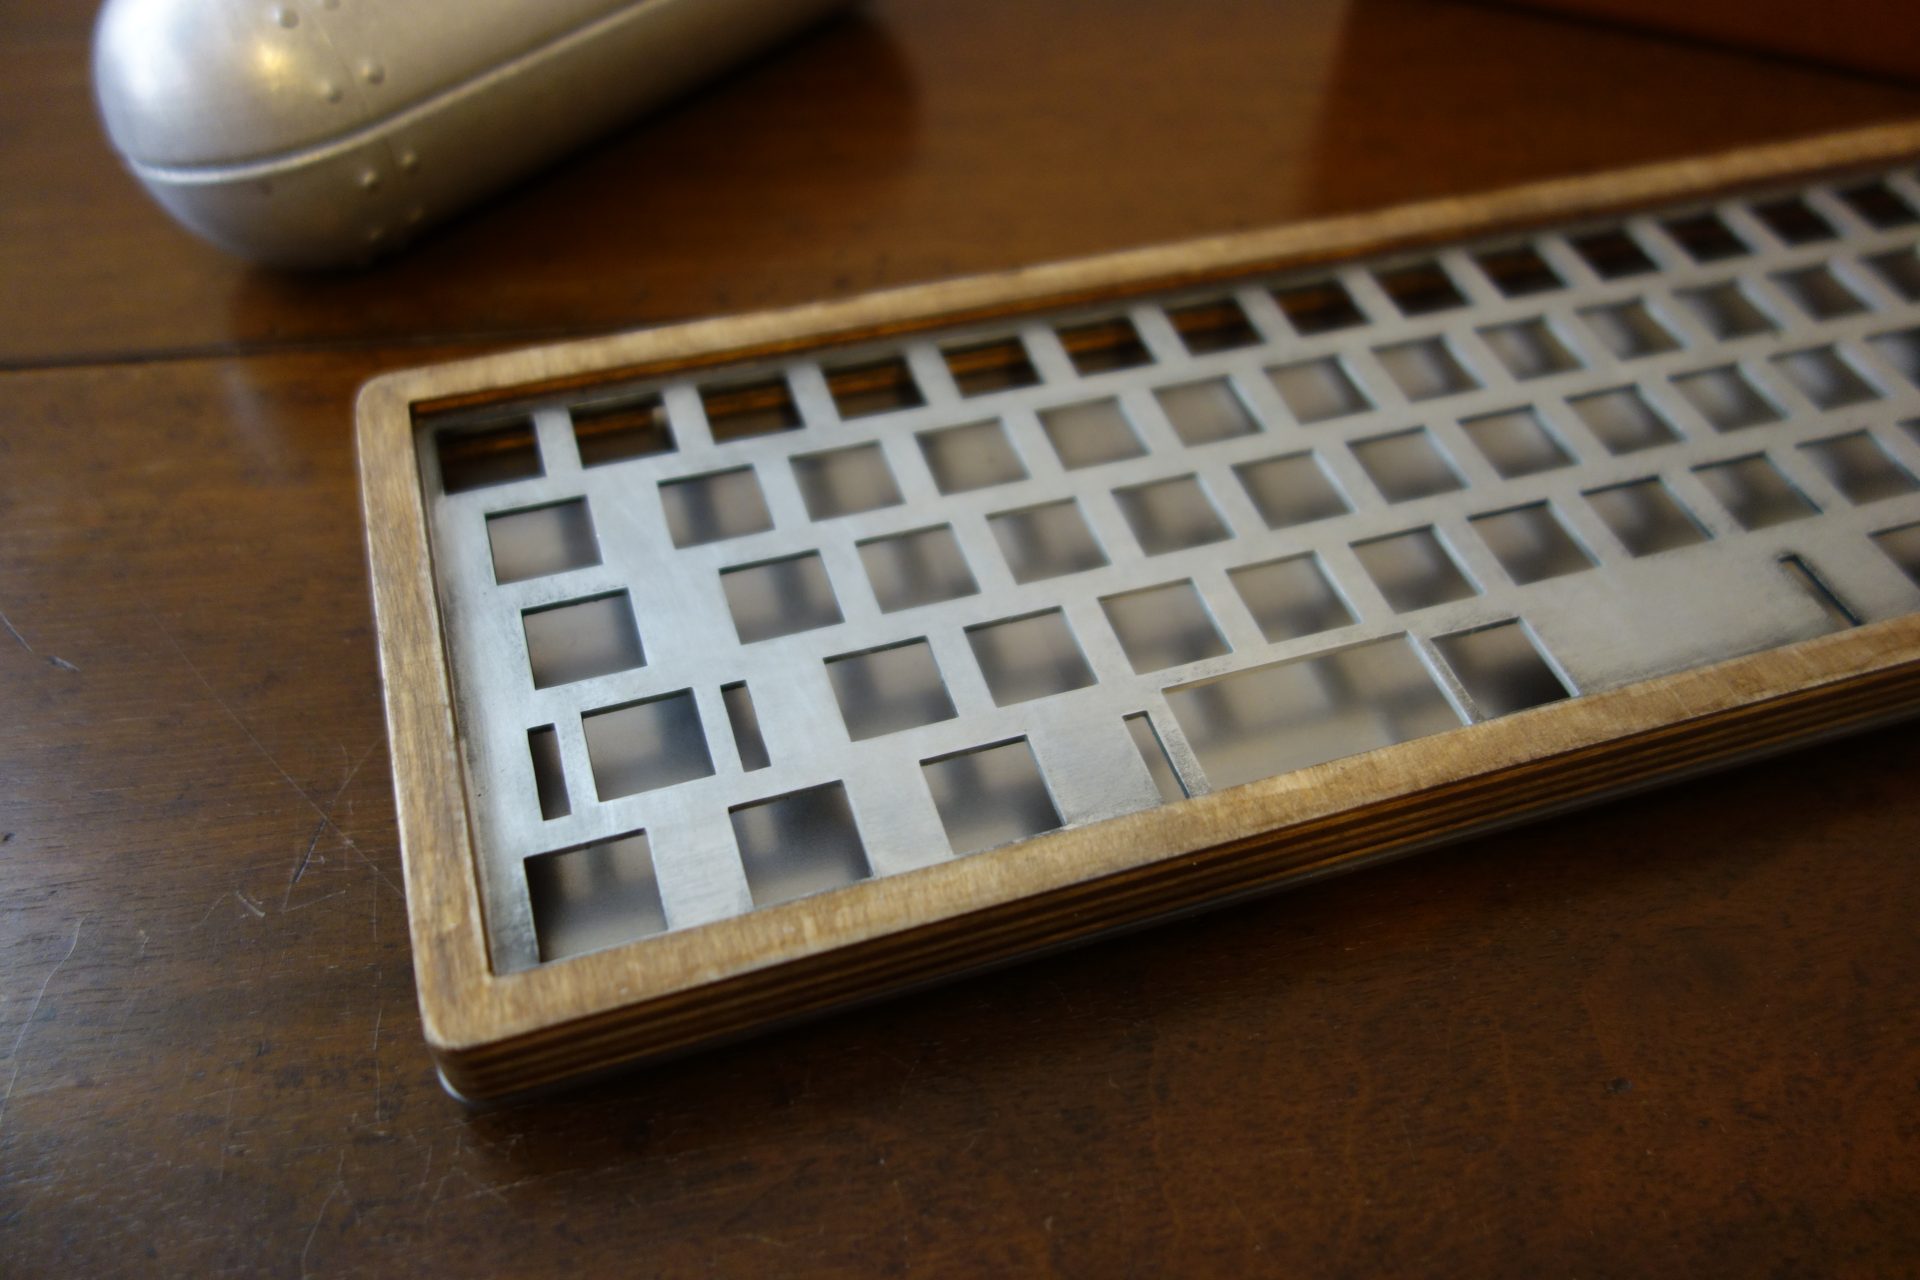
One of the cheapest options is laser cut acrylics sheets, AKA the sandwich case. You need one 1.5mm layer for the switch plate, another two or three layers for the sides up to the desired height and one for the bottom plate (usually another 1.5mm). Not needed but you can add a top frame to hide the side of the switches. Everything is held together with passthrough screws and bolts.
You can of course use other materials like stainless steel or aluminum (the former cheaper than the latter) or even mix materials and have for example acrylic sides and aluminum plates. One of the custom keyboards I’m most fond of has wooden sides, aluminum top plate and steel bottom plate to add weight.
So, how tall should each layer be? Let’s examine a switch measurements.
The switch plate is 1.5mm by Cherry specs. To fit the switch including the contact pins we need about 7mm and finally we need to close the case with another 1.5mm layer. The overall keyboard height will be 10mm.
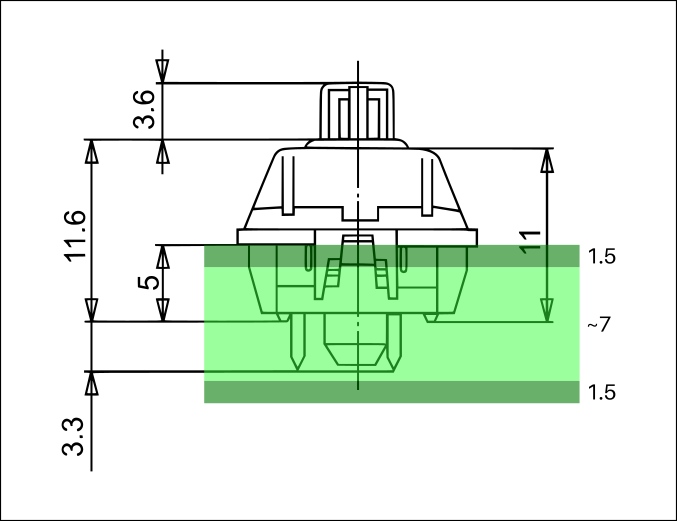
When laser cutting we tend to re-use the same sheets as much as possible. Since we need 1.5mm for the plate we can either use 7×1.5mm layers or 2×1.5mm and 2×4mm. Thicker acrylic sheets are expensive and I try to avoid them, but of course you can have one single chunk of 8mm acrylic (or even thicker).
Someone prefers to skip the top plate altogether and stick the switches directly into a 5mm layer. The switches won’t clip in, but they stay in position by friction. This solution is rather sexy, but requires a PCB (ie: no hand wiring).
Even though a 10mm case is totally feasible, I would advice to always add a couple of millimeter clearance “just in case”. Remember that we also have to fit a controller and possibly route an extension cable and you don’t want to risk to throw away a case just because you can’t fit a component by a whisker.
An even cheaper option is to skip the sides altogether and connect top and bottom plates with just four side spacers/stand-offs. The keyboard won’t be the fanciest but it would totally work. Also remember that aluminum is easy to bend and often laser cutters also offer a metal bending service. If you design it carefully the whole keyboard could be just made of the top plate with two tabs on the top and bottom to form the feet.
Plate material
A quick note about plate materials. This is a topic that comes out every now and then on community sites. Of course it’s mostly down to personal preference but let me share my experience.
You may be tempted to go stainless steel. It’s relatively cheap and looks like a cool idea. The problem with it is stiffness. One of my first custom was a 1kg of pure stainless steel; sturdy and beautiful I thought it was a smartass’s idea. It turned out stiffness is not good for typing. After long sessions at the PC my fingers hurt and I had to revert to aluminum.
So despite being a poorer material, at the end of the day acrylic is a better option.
Another material that is often overlooked is wood. It seems the greatest concern is about sound and reverb. I made a couple of wooden keyboards and they all sounds pretty great, actually better than their metal counterparts. Here below the sound proof.
What about brass/titanium/silver/carbon fiber/…?
Brass is often requested, mainly for it’s weight, but I believe oxidation is the main concern here. I tried a titanium plate and it’s too stiff, definitely not my thing. Also I got splinters all over my fingers (ouch!). Silver, if you can afford it, be my guest! At the end this is your custom keyboard, by all means, go crazy!
Controller
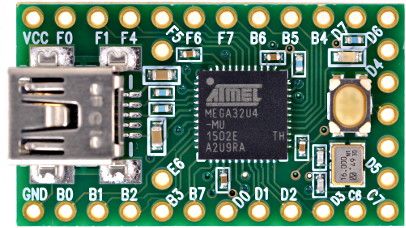
The Teensy 2.0 is probably the easiest most stable controller you can use for your keyboard. You can’t go wrong with it; and if you need more keys you can grab a Teensy++ 2.0. One may argue that it’s based an _old_ MCU, but it’s really small, well tested and most importantly supported by Hasu’s TMK firmware. Of course the Teensy 3.x is also an option for which maybe you may prefer the QMK firmware.
Any other compatible controller should work, just be sure it has a native USB support and not a software implementation (known as V-USB). That would reduce the amount of hassle when programming and flashing the firmware.
What’s the best spot to place a controller?
If you can place it to the top side you could connect it directly to a USB cable and it would spare you some trouble, but Teensy does not come with screw holes so first of all you need to find a way to fix it to the case; secondly you don’t have much space in the top row to fix the controller, meaning that you’d have to make the case taller (at least on the back) to host the MCU.
Personally I like to hide the Teensy just under the spacebar, between the switch and the left stabilizer. That of course forces me to make an extension cable that goes from the controller USB to a female USB port anywhere on the back side of the keyboard.
By now you should have a basic understanding of the anatomy of a keyboard. Next chapter we will finally delve into the actual making of a small keyboard. Warm up your soldering iron, things are getting serious!
Comments
> Someone prefers to skip the top plate altogether and stick the switches directly into a 5mm layer. The switches won’t clip in, but they stay in position by friction. This solution is rather sexy, but requires a PCB (ie: no hand wiring).
You can use a thick layer if doing handwiring, you just have to glue in the switches. Either CA-glue directly on the top, or hot glue from the bottom works well.
yes, that would be doable!
Can’t wait for the next post!
Does a 1.5mm steel or brass plate (not aluminium) need support stand-offs distributed across the bottom?
I’m planning a build with a layout like the MasterKeys Pro M and was wondering if supports around the rim of the plate would be enough to prevent bending it in the middle during furious typing sessions. :-)
steel doesn’t need any support. I never tried brass, but I guess it wouldn’t need supports either.
That’s great.
Thank you very much.
You have the photos for flat and angled profiles mixed up.
thanks! fixed
I am loving these posts, thank you so much for writing them.
Is there any way I can sign up for updates when you post the next section? Forum, Twitter, mailing list, RSS?
I’d suggest you to subscribe to the RSS http://matt3o.com/feed/
I will set up a newsletter sooner or later :D
Hello, I am really loving these ideas of making own mechanical keyboard.
I am more interested in making my own slider keypad case for my Nokia 6 cellular device.
Please guide me how shall I start it.I would be very grateful to you. Now a days I am just getting crazy even in my dreams of making such slider QWERTY keypad.
what is that you are trying to do again? pics?
That case with wooden sides and aluminium plate looks amazing!
I’d be interested in making one like that for myself.
Could you recommend me a site to get a plate made?
where are you located? it was all laser cut (both plate and sides), pretty easy to really.
Hi there! So glad I found this series as this is a project I’ve always wanted to do.
I’m wondering if you can delve into the cutout profiles for stabilizers as well like you did for the standard switch here (https://cdn.matt3o.com/uploads/2018/05/keycap-size-diagram.png)
you are right! I’ll work on that too.
Thanks so much! Though, I did find http://builder.swillkb.com/ after finding your website which seems to take care of most of the hard part for you!
Yo matt, been following your Brown Fox instruction, my problem is I have 14 columns and 5 rows. How should I wire it?
exactly the same way just skip 2 columns :)
Clarification. When you say an e.g. 2u would be 19.05*2 = 38.1… that’s just the mount-to-mount spacing. For your 1u, you used 18mm as an example outer dimension. Would a 2u just keep that up? For example a 1u is 18mm, so the distance between each key will be 1.05mm (they each contribute half of this distance). So… would a 2u be (38.1mm-1.05mm = 37.05mm) for the outside diameter?
what matters is the switch hole on the plate (ie: the switch position). A 2u keycap take the space of 2x1u including the gap between them
When you mention “passthrough screws and bolts” what exactly do you mean. And if possible could you send me a link to the ones you use or something similar?
just a screw that pass through all the keyboard layers. held by a nut at the end.
Ok Thanks for the clarification.
Sorry, comments are closed but you can still get in touch with the contact form.